Last updated: January 2026
Every experienced winter swimmer knows this truth: what happens in the first 40 minutes after you exit the water determines whether you’ll swim again tomorrow or spend the rest of the day questioning your life choices.
This 10-40 minute window—when afterdrop is actively occurring—is where most cold water swimming mistakes happen. It’s when swimmers get dressed too slowly, wear inadequate clothing, attempt to drive before they’re ready, or simply “tough it out” when they should be actively managing their recovery.
Understanding why this window matters and what to do during it transforms winter swimming from a miserable ordeal into a sustainable practice.
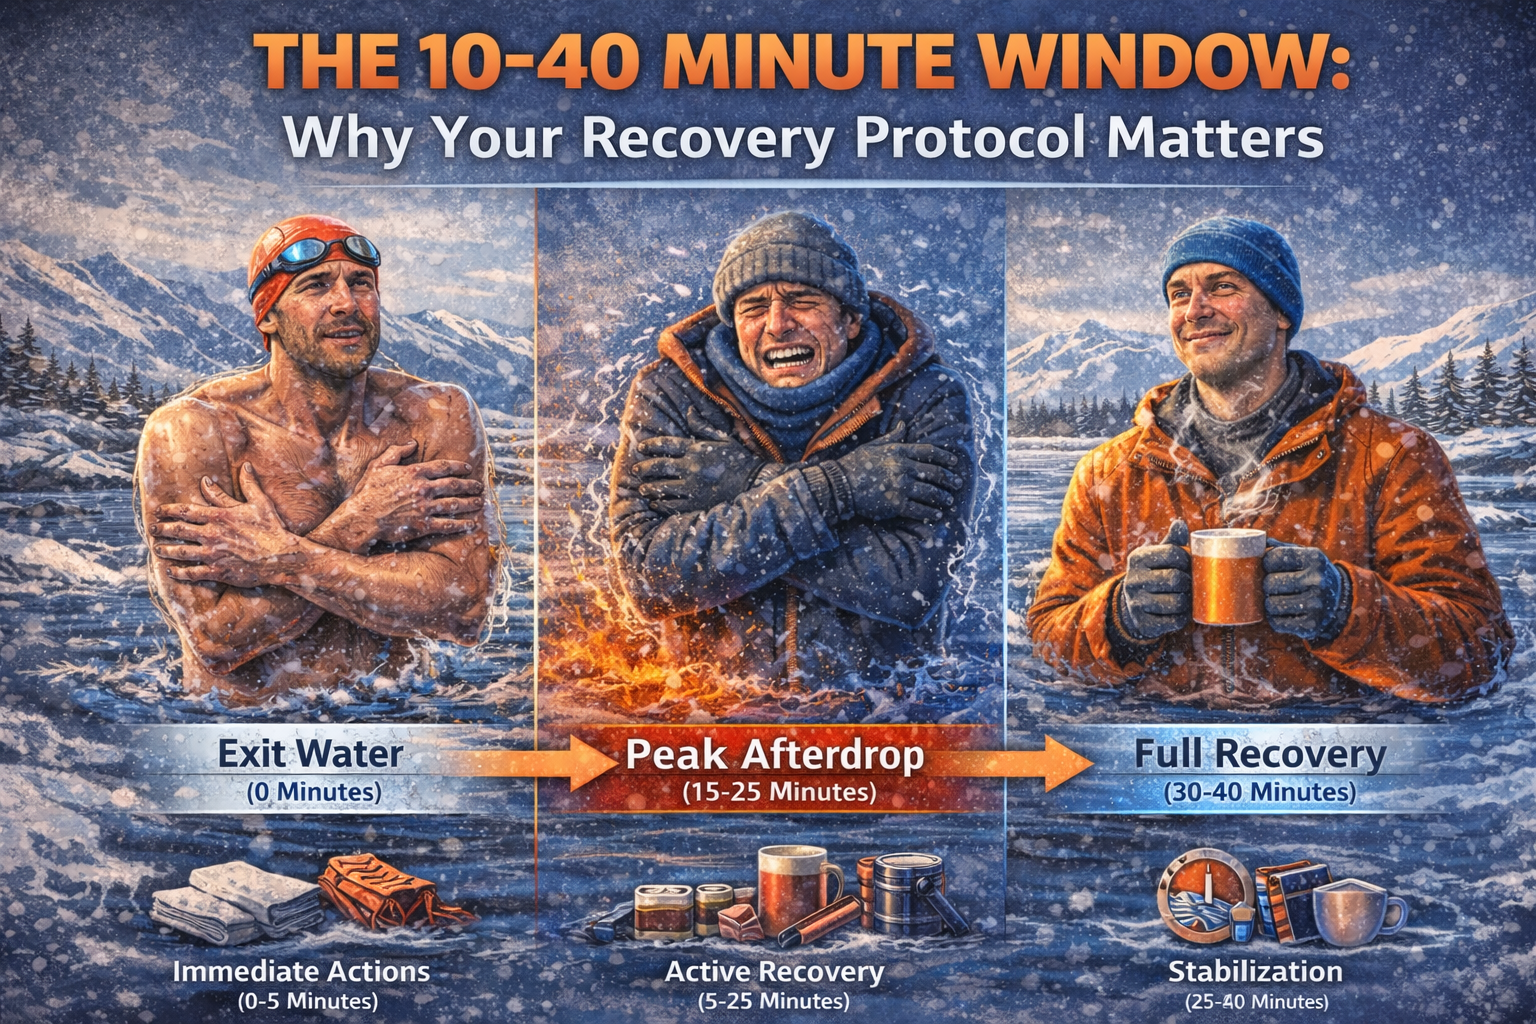
What’s Happening During the 10-40 Minute Window
When you exit cold water, your core temperature doesn’t stabilize immediately. Instead, it continues dropping for 10-40 minutes due to afterdrop—the process where cold blood from your extremities returns to your core.
The timeline:
- 0-10 minutes: You might feel fine, even warm from exertion
- 10-25 minutes: Core temperature reaches its lowest point, shivering intensifies
- 25-40 minutes: Temperature begins to stabilize and rise, shivering decreases
- 40+ minutes: Return to normal core temperature
The severity varies based on water temperature, swim duration, body composition, and acclimatization. But the window exists for everyone.
Critical insight: Research shows that proper intervention during this window can reduce afterdrop severity by up to 60%. This isn’t just comfort—it’s the difference between safe recovery and potentially dangerous hypothermia.
The Three Phases of Recovery
Phase 1: Immediate Actions (0-5 Minutes)
Goal: Stop further heat loss as quickly as possible.
Protocol:
- Exit water calmly and move to changing area
- Remove wet swimwear immediately
- Rough dry with towel (speed over thoroughness)
- Put on dry base layer against skin
- Put on insulated trousers (Cuddlr fleece-lined or similar)
- Put on thermal hat
- Get into changing robe/dryrobe
- Put on thick socks
Why speed matters: Every second you spend in wet swimwear or exposed to wind accelerates heat loss. Your window for effective intervention is narrow.
Common mistake: Taking time to dry thoroughly. You don’t need to be completely dry—you need to be insulated. Get layers on quickly.
Phase 2: Active Recovery (5-25 Minutes)
Goal: Support your body’s natural warming process while monitoring for danger signs.
Protocol:
- Begin drinking hot, sweet beverage
- Do gentle movement (walking, arm swings, marching in place)
- Stay in sheltered area away from wind
- Add additional layers if needed
- Have high-calorie snack (chocolate, flapjack)
- Continue monitoring yourself and swimming partners
Why movement helps: Gentle activity generates internal heat through muscle contraction. But vigorous exercise worsens afterdrop by pumping more cold blood to your core.
The sweet spot: Movement that makes you feel slightly warmer but doesn’t make you breathe hard.
Common mistake: Either staying completely still (slower recovery) or doing jumping jacks and vigorous exercise (worsens afterdrop).
Phase 3: Stabilization (25-40 Minutes)
Goal: Allow body temperature to stabilize before transitioning to normal activities.
Protocol:
- Continue gentle movement as long as you’re shivering
- Finish hot drink and snack
- Begin changing into dry clothes for travel home
- Assess mental clarity before considering driving
- Ensure all shivering has stopped or significantly reduced
- Add warm outer jacket over recovery layers
Why waiting matters: Attempting to drive, operate equipment, or make important decisions while your core temperature is still unstable is dangerous. Cognitive function is impaired during afterdrop.
Common mistake: Rushing to leave because you “feel okay.” Feeling okay and being functionally recovered are different things.
The Critical Equipment for Each Phase
Phase 1 Equipment (Immediate):
- Quick-dry towel
- Merino wool base layer
- Fleece-lined weatherproof trousers (Cuddlr)
- Thermal hat
- Thick wool socks
- Changing robe/dryrobe
Phase 2 Equipment (Active Recovery):
- Insulated water bottle with hot drink
- Changing mat (keeps feet off cold ground)
- High-calorie snacks
- Neoprene gloves (if hands are very cold)
- Windbreak or shelter
Phase 3 Equipment (Stabilization):
- Dry clothes for travel
- Weatherproof jacket
- Additional warm layers
- Emergency thermal blanket (backup)
The complete system: When you have all three phases covered with proper equipment, recovery becomes systematic and predictable rather than chaotic and uncomfortable.
Danger Signs During the 10-40 Minute Window
Not all afterdrop is the same. Know when to seek help.
Normal afterdrop (manage with protocol):
- Progressive shivering that peaks then gradually decreases
- Feeling colder for first 10-15 minutes, then gradual improvement
- Mild difficulty with fine motor tasks (fumbling with zippers)
- Clear thinking and awareness
Concerning afterdrop (monitor closely):
- Shivering that increases in intensity beyond 15 minutes
- Difficulty speaking clearly
- Slowed thinking or confusion
- Extreme discomfort despite proper recovery gear
Dangerous afterdrop (seek help immediately):
- Violent, uncontrollable shaking that prevents any coordinated movement
- Confusion or altered mental state
- Inability to dress yourself or complete simple tasks
- Slurred speech that persists beyond 10 minutes
- Feeling faint, dizzy, or nauseous
- Paradoxical warming sensation (feeling warm when you should be cold)
If you or your swimming buddy experiences dangerous afterdrop:
- Do not let them drive
- Get additional insulation on them immediately
- Use emergency thermal blanket if available
- Call for help (999 in UK)
- Keep them sheltered and insulated
- Monitor continuously until help arrives
Real-World Recovery Scenarios
Scenario 1: Quick Dip, Mild Conditions
Conditions: 10°C water, 5-minute swim, 12°C air, light wind Expected recovery: Mild shivering for 10-15 minutes, full recovery in 20-25 minutes Protocol: Standard 3-phase recovery, minimal complications
Scenario 2: Extended Swim, Cold Conditions
Conditions: 5°C water, 10-minute swim, 6°C air, strong wind Expected recovery: Intense shivering for 15-20 minutes, full recovery in 30-40 minutes Protocol: Immediate shelter essential, all recovery gear critical, extended monitoring needed
Scenario 3: First Winter Swim, Poor Acclimatization
Conditions: 8°C water, 3-minute swim, first cold swim of season Expected recovery: Severe shivering despite short swim, recovery 25-35 minutes Protocol: Extra layers needed, extended shelter time, buddy monitoring critical
The lesson: Water temperature and swim duration don’t tell the whole story. Wind, air temperature, acclimatization, and individual factors all affect recovery needs.
Common Recovery Protocol Mistakes
Mistake 1: Inadequate Lower Body Coverage Most swimmers focus on upper body (changing robes, jackets) but neglect legs. Your legs contain massive muscle groups that continue dumping cold blood to your core throughout afterdrop.
Solution: Insulated trousers (like Cuddlr fleece-lined) are essential, not optional.
Mistake 2: Hot Shower Immediately A hot shower immediately after swimming causes rapid peripheral vasodilation, rushing cold blood to your core and worsening afterdrop.
Solution: Wait until shivering subsides, then use warm (not hot) water.
Mistake 3: Sitting Still in Car Getting into your car and sitting motionless with the heater on seems logical but slows recovery.
Solution: Do gentle movement for first 15-20 minutes, then get in car.
Mistake 4: Alcohol Consumption Alcohol creates false sensation of warmth while actually increasing heat loss and impairing thermoregulation.
Solution: Save the celebratory drink until you’re fully recovered and home safely.
Mistake 5: Rushing to Leave Packing up and driving away within 10 minutes of exiting water is dangerous. Your cognitive function is impaired even if you “feel fine.”
Solution: Plan 30-40 minutes minimum for full recovery before driving.
Developing Your Personal Recovery Protocol
Everyone’s recovery needs are slightly different. Here’s how to develop your optimal protocol:
Step 1: Baseline Testing (Mild Conditions) Do your first protocol tests in easier conditions:
- Water temp 10°C or above
- Short swim (5 minutes)
- Calm weather
- Swimming with experienced group
Step 2: Track Your Response After each swim, note:
- How long until shivering started
- Peak shivering intensity and timing
- When shivering stopped
- Total time to feel fully recovered
- What gear worked well
- What you wish you’d had
Step 3: Refine Your System Based on your tracking:
- Identify which layers you need most
- Determine your optimal changing sequence
- Find your ideal hot drink and snack
- Learn your personal recovery timeline
Step 4: Test in Harder Conditions Gradually expose your refined protocol to:
- Colder water
- Longer swims
- Windier conditions
- Early season (poor acclimatization)
Step 5: Know Your Limits Through testing, you’ll learn:
- Your maximum safe swim duration at various temperatures
- What gear is non-negotiable vs. nice-to-have
- How long you need before you can safely drive
- Warning signs that you’ve pushed too far
The Mental Aspect: Protocol as Ritual
Here’s something experienced winter swimmers understand: a reliable recovery protocol isn’t just physical—it’s psychological.
When you have a systematic, tested protocol, the post-swim experience becomes predictable. You’re not anxious about afterdrop because you know exactly what to expect and exactly what to do.
The ritual becomes meditative:
- The methodical changing sequence
- The first sip of hot chocolate
- The gentle walking while wrapped in your dryrobe
- The gradual return of warmth to your extremities
- The satisfaction of managing the cold effectively
This psychological confidence is what allows people to swim week after week, winter after winter. Without it, every swim is an exercise in anxiety and discomfort.
Winter Swimming Is Only Sustainable With Proper Recovery
Here’s the uncomfortable truth: if your recovery protocol is inadequate, you won’t keep winter swimming.
You might survive a few swims powered by enthusiasm and determination. But eventually, the misery of poor recovery will outweigh the joy of the swim. You’ll find excuses not to go. You’ll stop swimming through winter.
The swimmers who thrive through multiple winters all have one thing in common: They’ve mastered the 10-40 minute window.
They exit the water with confidence because they know their protocol works. They manage afterdrop systematically. They recover efficiently. They drive home safely. They’re ready to swim again in a few days.
That’s the difference between winter swimming as an occasional challenge and winter swimming as a sustainable practice.
Final Thoughts
The 10-40 minute window isn’t just about physical recovery—it’s about respecting the physiological reality of cold water swimming.
Your body is going through a significant stress response during this period. How you support it determines whether that stress is manageable challenge or dangerous exposure.
Invest in proper recovery gear. Develop your systematic protocol. Give yourself the full recovery time. Monitor yourself and your swimming buddies.
The water will still be cold tomorrow. The challenge will still be there. Take the time to recover properly.
That’s what separates Winter Dippers from people who tried winter swimming once.
—Written by a swimmer who learned these lessons through five winters and more uncomfortable recovery periods than I’d like to remember